

Overview
The Fastest Way to Create Effects
Whether you’re working solo or are a professional editor, colorist or finishing artist, Fusion lets you complete shots faster. That's because instead of sending out graphics, retouch jobs, or full blown visual effects shots to another system, all of the tools you need are built in. You can seamlessly move between the edit, Fusion and color pages with a single click. Fusion lets you quickly design lower thirds, animate 3D infographics or pull perfectly clean keys on a green screen shot. Multiple masks can be created, tracked and then passed to the color page, saving time and making intricate secondary color corrections such as realistic sky replacements, easier and better looking than ever.
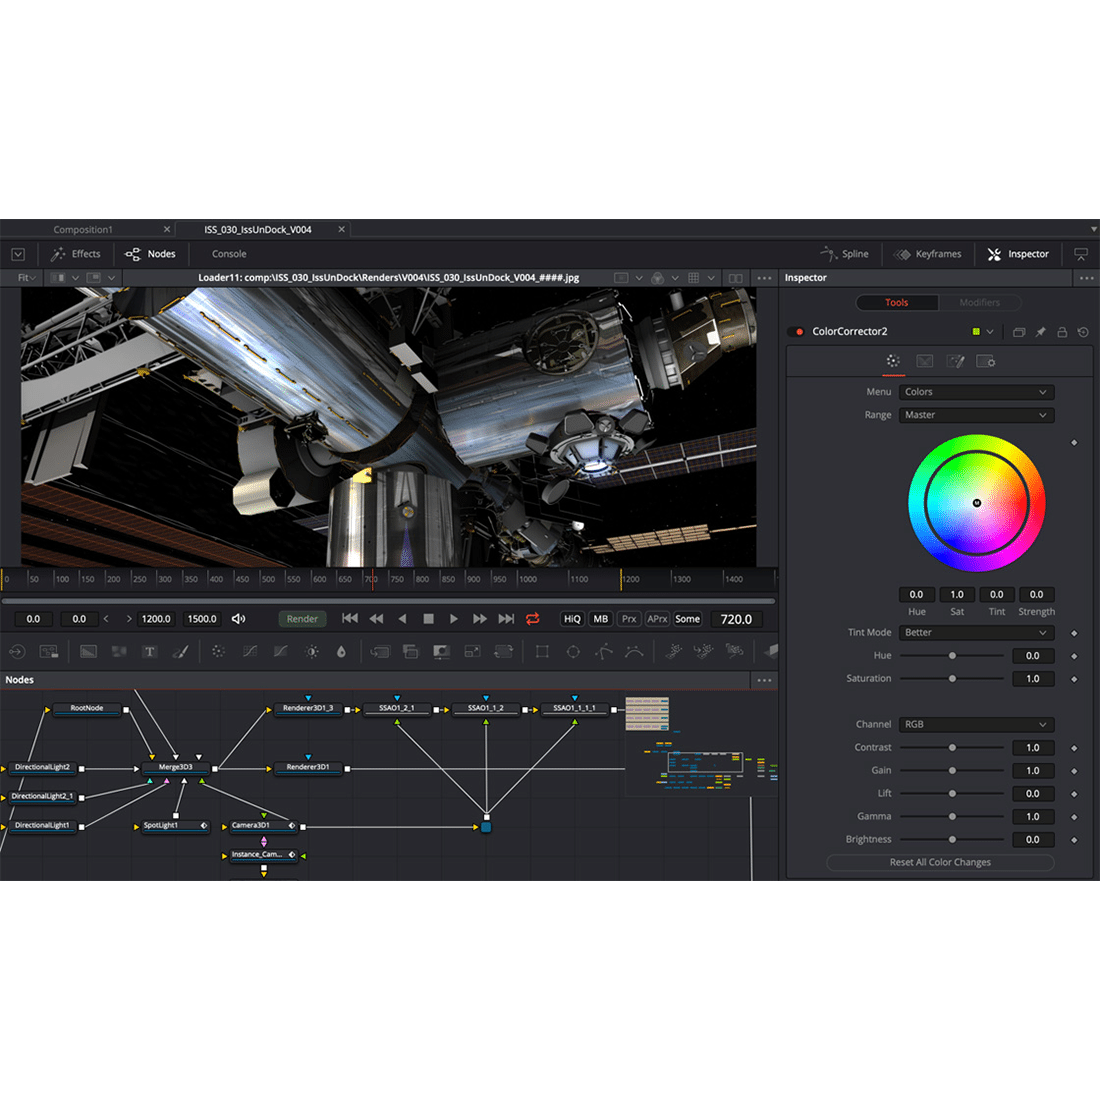
Nodes Are Easier Than Layers
Fusion uses a flow chart called a node tree that visually maps out how effects are connected and work together. Nodes are like building blocks that represent effect tools, generators, transforms, masks and more. There are no confusing stacks of nested layers and hidden menus! You build effects by stringing nodes together one after the other. The MediaIn node represents the clip from the edit timeline. To add a blur, drag the blur node from the toolbar to your flow chart and connect it in sequence after the media in. Simply drag the output from the MediaIn node and connect it to the input of the blur node. Tools can be combined in any order, letting you create an unlimited number of effects!
The Fusion Workflow
There are five simple operations in the Fusion workflow that are the basis for all of your work. You merge images together, insert effects, use masks to isolate effects, adjust settings and fine tune your animations. You start by merging images together in either 2D or a true 3D workspace. Next, insert effects in between nodes. After that, you can create masks to limit effects to specific areas of the image, then adjust tool settings in the inspector. Lastly, you can fine-tune your animation by using the spline and keyframe editors. Once you’ve mastered these basics, you’ll be able to combine techniques to create virtually any type of visual effect or motion graphic animation that you want!
Animate 2D and 3D Titles
Text can be designed in either 2D or 3D. For 2D text, drag a Text+ node into the node tree and type your text to get started. You’ll find advanced yet familiar text controls in the inspector for font, size, alignment, spacing, kerning, leading and more. Click on the shading tab to stylize text with gradient or video fills, outlines, drop shadows and glows. Adding a Text 3D node gives you similar formatting controls along with 3D extrusion, custom beveled edges and more. To add textures, surface properties and reflections, just connect a replace material node to the text 3D node. You’ll find controls in the inspector to animate entire blocks of text, lines, words or even individual characters!
Add and Track Infographics
The Fusion page allows you to quickly and precisely add and track infographics. First, connect a tracker to your clip, use the on screen controls to place the tracker over the part of the image to which you want to attach the graphic, then click track forward. After the track is complete, click on the operation tab and change the operation to “match move”. This turns the tracker into a merge node! Import your multi layered Photoshop files using the import menu or by dragging them in from the media pool. Connect the graphic to the green foreground input on the tracker node to complete the composite. Now, as you animate your graphics, they’ll move in sync with the tracked object in your scene.
Paint Out Unwanted Objects
The vector paint tool includes multiple brush types and stroke styles that can be edited and animated at any time. Paint can be used for creative and corrective purposes. For example, you can paint leaves swirling in the wind or clone out an unwanted boom mic hanging in a shot! To clone out an object, add the paint tool from the toolbar and connect it to a clip. The tools at the top of the viewer let you set the paint stroke to operate on a single frame or a range of frames. Select clone mode in the inspector, then option click in the viewer an area to sample. Then paint over another part of the image to clone it out! Paint strokes can also be set to follow tracked moving objects in the shot.
Replace Signs, Screens And Billboards
Fusion’s powerful planar tracker lets you add new screens to a smartphone, replace a sign on the side of a moving truck, add a new billboard to a shot and more. All you have to do is connect a clip to the planar tracker, draw a shape around the area you want to track and click the track forward button in the inspector. A tracking cloud will be created with a precise motion path that contains position, rotation, scaling, and perspective changes. The planar tracker node includes built in corner pinning, making it easy to connect the new screen or sign into the node and position the four corners. You can even use the tracker data to animate mask shapes, making rotoscoping tasks incredibly fast!
Remove Green and Blue Screens
Fusion's Delta Keyer quickly removes green and blue screen backgrounds so you can place actors into settings that are impossible to shoot. Setting up your key is simple. Start by dragging the Delta Keyer from the effects library onto the line between your green screen clip and the foreground input on the merge node. From the inspector, drag the eye dropper into the viewer to sample the color you want to remove. The pre-matte, matte, fringe and tuning tabs give you a complete set of controls to refine the key until it’s perfect! You can also add a clean plate node which makes it easier to remove the background from shots and is especially useful for clips with reflections, hair and smoke!
Add 3D Particle Effects
Particles can be used to create realistic atmospheric effects like fire, rain or smoke, or fantastic swirling glowing bits for use in motion graphics and broadcast design. You can create particle systems from any type of image. To create particles, you need to add both a particle emitter and a particle renderer to your node tree. Click the particle emitter and open the inspector to customize and start animating your particles. There are more than a dozen particle specific nodes that can be inserted between the emitter and renderer to simulate gravity, friction, turbulence, bounce and more. Best of all, particles work in 3D so you can make them flow around and bounce off other elements in the scene!
Track and Follow Any Object
Tracking plays a key role in creating sophisticated visual effects and motion graphics. Fusion makes tracking easy with advanced 3D camera tracking, powerful planar tracking and rock solid 2D tracking. The 2D tracker is great for following most objects that move throughout a scene. Planar tracking lets you track image planes, or flat objects, in a scene. It’s ideal for replacing signs or screens. The 3D camera tracker is extremely powerful because it analyzes the motion of the camera that shot the original scene and recreates it in 3D space. This lets you add objects such as text, 3D model set pieces, or even atmospheric particles such as fog or smoke that seamlessly blend into the scene.
Speed Up Your Workflow
Fusion is packed with time saving tricks to help you click less and move faster. Keyboard shortcuts like Shift+Spacebar enables a tool search window, type in the tool name and press enter to add the tool. Node versioning is perfect for trying out new animations without duplicating a node. Quickly switch between versions by clicking on the numbers located at the top of the inspector. The clip timeline gives you quick access to every clip in the timeline on the edit page, so you can work on new shots without having to leave the Fusion page. Lastly, quickly view any selected node in the right and left viewers by pressing the number 1 or 2 key, and clear all viewers by pressing the tilde key.
Advanced Visual Effects and Motion Graphics Tools
The Fusion page features hundreds of advanced feature rich tools for creating photorealistic visual effects, powerful broadcast graphics and sophisticated title animations. Unleash your imagination with an infinite 3D workspace, transport characters to new worlds with 3D set extensions, or build custom templates that can be used right from the edit and cut pages for efficient broadcast workflows. Best of all, Fusion’s powerful spline based keyframe editor and expressions let you create incredibly smooth and sophisticated animations. There's even built in scripting and automation. There really is no limit to what you can achieve with Fusion, and it’s right inside of DaVinci Resolve!
True 3D Workspace
Fusion features a true 3D workspace for compositing and creating cinematic visual effects and advanced broadcast motion graphics. It’s ideal for adding 3D models, objects, text or particles to your footage. To start, use the basic 3D nodes such as shape or text nodes, along with the 3D merge and camera nodes. There are a vast number of 3D tools to help you generate and manipulate surfaces, bend meshes and more. The 3D merge tool lets you add an unlimited number of objects, lights and cameras into your scene. 2D images can be used in 3D by placing them on 3D shapes such as image planes, spheres, or other objects and combining them with 3D text, lights and cameras to create dramatic designs.
Import and Render 3D Models
You can import 3D models or even entire 3D scenes from apps such as Maya and 3D Studio Max directly into your shots on the Fusion page. Using the FBX import menu, Fusion gives you the option to import FBX (Filmbox) scenes or Alembic animated geometry files, dramatically increasing your creative options for visual effects and motion graphics. For example, you can import a 3D model of a mobile phone and replace its screen, add a new car into a commercial spot, create a swarm of attacking spaceships, or add a dragon fighting live action knights in front of a castle! Then add textures, shading and lights, composite your actors into the shot and create photorealistic Hollywood style effects!
Realistic Lighting and Shading
Fusion’s sophisticated lighting tools let you add truly realistic lighting effects to your 3D scenes. You can add an unlimited number of customizable light sources such as ambient lights, directional spot lights and point lights. Directional spot lights can cast shadows. Color, angle, intensity, falloff and other lighting parameters can be adjusted and animated over time. You can even control how elements within a 3D scene react to lighting as well as define which objects cast shadows and reflections. To see the effects of your lights in the 3D viewers, click on the lighting button at the top of your viewer and don’t forget to enable lighting when you’re ready to render the final shot!
Spline Based Animation
The Spline Editor, which can be opened by clicking on its icon at the top right, gives you incredible control over curves that control the speed, or rate of change, in an animation. You can change the speed between keyframes using linear or fully customizable bezier and b-spline curves. The spline editor features a strip at the bottom with tools to reverse, loop or ping pong animations, making it faster and easier to create keyframe animations. You can even squish and stretch keyframes to shorten or lengthen animations without changing the relative motion! Curve shapes can be copied and pasted between parameters, independent of values, so you can create consistent, perfectly timed animations.
Modifiers and Expressions for Dynamic Animations
Quickly create dynamic animations by linking parameters together with modifiers and expressions. When one parameter changes, the others will automatically follow based on how you’ve customized their relationship to each other. For example, when working with text, you can add a special "follower" modifier that lets you create sequential text animations line by line, word by word, or even character by character. You can then add an expression that adjusts the blur parameter as character positions change over time. This allows you to quickly create sophisticated and dynamic animations in which multiple parameters change at the same time, all without having to manually animate each setting!
Advanced Mask and Rotoscope Tools
Rotoscoping is a technique used in visual effects compositing to cut characters or elements out of a scene so you can seamlessly place them in another. Fusion’s masking tools let you perform advanced rotoscoping with bezier and B-spline shapes. You can track masks with the planar or 2D trackers, set custom feathering per point for precise blending, and use keyboard shortcuts to quickly manipulate shapes in the viewer to help you work faster. Masks and roto shapes can all be animated to morph as characters and objects change in a scene. This level of control lets you create feature film quality VFX composites. You can even send masks back to the color page to perform isolated corrections.
Create Your Own Templates
Lower third titles, animated background generators and custom transition templates can all be created in Fusion and added to the effects library on the edit page so they can be used in any project. When you build a template, you decide which controls will appear on the edit page. Templates are created by selecting nodes in a composition, right clicking and choosing "create macro" from the pop up menu. Simply check the parameters you want to expose, enter a custom name and save it. Templates are great for brand consistency. With pre-built custom templates, editors don’t have to wait for designers to render titles, and motion graphic artists don’t have to worry about editors changing their designs!
Volumetric Effects
Adding environmental atmospheric effects such as fog, mist, rain and smoke can dramatically increase realism in a scene. Fusion uses GPU acceleration so you can instantly see how these types of effects interact with the rest of the scene, all without having to wait for renders! Volumetric effects work in 3D space so they can flow and swirl around other objects. They can also use 3D world position data found in deep pixel render files, allowing the effects to realistically move both in front of and behind 2D deep pixel elements! There are tools to define attraction, repulsion, collision detection and more, along with special masking tools that make working with volumetric effects faster and easier.
Deep Pixel Compositing
Deep pixel compositing uses 3D metadata stored in a 2D file to speed up the process of compositing elements such as actors, other 3D objects, volumetric effects or anything else in a scene. Instead of being a simple flat image, every single pixel has a 3D x, y and z coordinate. When you render a 2D EXR image out of a 3D application you get RGBA (red, green, blue and transparency) data for every single pixel, along with XYZ position information. That means you don’t have to load massive 3D scene models that take a long time to render. It allows you to add fog, custom lights or actors and render it in seconds, not hours, as it would in 3D software that uses full models with complex geometry!
Virtual Set Extensions
Regardless of your budget, it has become increasingly impractical to build massive sets. That’s why live action scenes are often shot on smaller sets and then composited into computer generated set extensions that make them look massive! Fusion can import and render 3D models and scenes from popular software like Maya and 3D Studio Max, so you can composite, light and render in one step. In addition, projection tools can be used to quickly render scenes, without having to use complex 3D geometry! With proper lighting and compositing techniques, virtual set extensions can blend seamlessly with live action shots to give you an epic cinematic look, all on an indie filmmaker’s budget!
Scripting and Automation
Once you’ve designed titles and graphics, creating and updating them with current data can be tedious. With support for Python and Lua built in, you can write scripts to automate repetitive tasks and to feed live data sources into your animations in realtime. For example, you can use a Python or Lua script, along with a simple text document, to automatically create and render updated broadcast graphics, titles and animations with things such as up to the minute weather forecasts, sport scores and player statistics, news headlines and more. It’s not just for motion graphics, either. It goes beyond motion graphics as scripting can speed up your workflow by automating virtually any repetitive task!
Key Features
- Advanced 2D and 3D compositing, VR and motion graphics software
- Integrated 2D and 3D compositing in an animation environment
- Resolution independent with support for images over 32K x 32K
- Mix and match footage of different resolutions, field orders, aspect ratios and formats within a single project
- Footage of different color depths can be processed in their native color depth within a single flow graph
- Responsive UI with interactive, real time rendering
- Render to multiple formats and resolutions in a single pass, with multiple saver nodes at any position in the flow process
- Seamlessly blend floating point, 64 bit and 32 bit images without concern
- Two-level proxy system for fast interactive response
- Open and work with multiple comps at once
- Open unlimited floating display views
- Save Custom interface Layouts
- Use Independent LUT’s for each display view
- Support for dual displays
- A/B split view for comparing shots
- View and edit your project in frames, timecode or feet+frames modes
What’s In The Box
- 1 x Blackmagic Fusion 16 Studio Software